Building the Web
Create and publish your own web page
Welcome to Building the Web!
This workshop is designed to introduce you to the basics of web development through a few short coding challenges.
By the end of the workshop you will have coded and published your very own web page!
Say hi to your mentors!
Your mentors are here to help if you get stuck,
Your mentors are super friendly, make sure to say hi.
They actually get paid to do this stuff for a job, which is super cool.
You can ask them for help with your code, ask them about their day job, or ask them what their favourite colour is.
They're here to help, so ask them anything :)
Introductions
What is your:
Favourite thing?
Super power?
First name?
Let's quickly go around the room and introduce ourselves.
Tell us all one of your favourite things - favourite food, sport, hobby, animal, anything!
If you could choose one super power, which would it be?
Last of all, tell us your name.
Schedule
How the Internet Works HTML and CSS Basics
Morning Break
Layouts and Menu Bars Embedding Videos
Lunch Break
Photo Gallery Publishing
Today's workshop is arranged in six different sections.
In the first part we will look at how the Internet works and what this means for us as coders, plus take a look at the basics of web code languages.
After that we will start working on our own websites, so think about a topic! We'll design a page layout and a menu bar.
Later we will add some fancy extras to our site, like YouTube videos and a gallery.
Mission One
Figure out how the Internet works
Let's start by taking a look at how the Internet works and what this means for us as coders.
What is the Internet?
If a 5-year-old asked you "What is the Internet?"
Before we start coding, let's have a think about what the Internet actually is.
How would you explain it to a younger friend or family member?
Could you exlain in just one sentence?
Internet Brainstorm
What do we use the Internet for?
How do we access the Internet?
Who pays for the Internet, and who gets paid?
Maybe it would be easier to describe the Internet in smaller pieces. Have a go at answering these questions:
- What do we use the Internet for?
- How do we access the Internet?
- Who pays for the Internet, and who gets paid?
See if you can come up with at least one answer for each of the questions above.
The Internet
So, the next challenge is this: of the words you came up with, which ones relate to the Internet, and which ones relate to the World Wide Web?
We quite often use the phrases _The Web_ and _The Internet_ to mean the same thing, but you may be surprised to learn that they are in fact quite different.
Any idea what the difference might be?
The Internet
A global system of interconnected computer networks.
The Internet is a network
World Wide Web
A system of interlinked documents, accessed via the Internet.
The Web is a network
The Internet is what we use to access the World Wide Web.
The World Wide Web is the content that we consume.
When we create a website on the World Wide Web, we are contributing to the set of _interlinked documents_.
When we access the Internet, we are making use of a worldwide network of _interlinked computers_.
Can you identify which of your Internet-related words from earlier apply to the Internet, and which ones really apply to the World Wide Web?
Who owns it all?
Who owns the Internet? And who owns the Web?
So who owns the Internet?
And who owns the web?
Telecom? The United States? Whoever invented it?
Who owns the Internet?
Who owns the World Wide Web?
Nobody can claim ownership of the Internet, but many people own parts of the system which make the Internet possible.
The web is a set of documents, so nobody can claim ownership of the web either.
You still own your own contribution though, right?
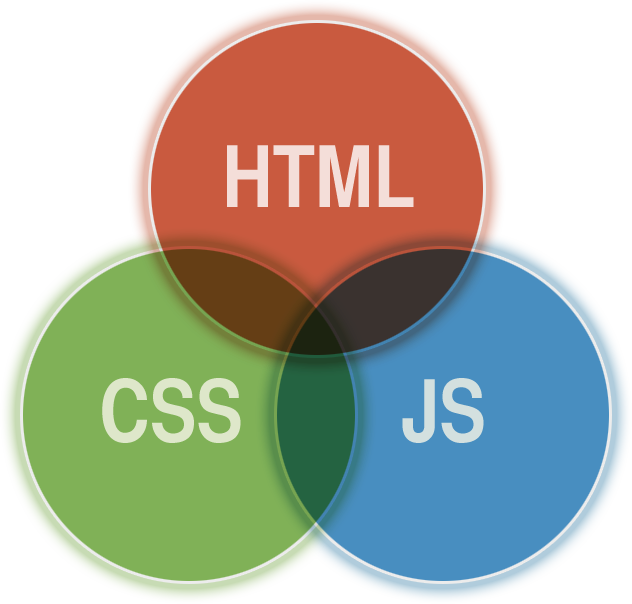
A web page is made of three main languages
Websites are made of many languages, but your most basic web page, what you see in your browser, is made up of three programming languages.
That's three different types of code, each with their own rules.
They all work together to display what you see on the screen.
HTML is the markup language
HTML is used to define the content of a web page: the words, the pictures, the links.
It does not define any sizes, colours or layout.
HTML stand for HyperText Markup Language.
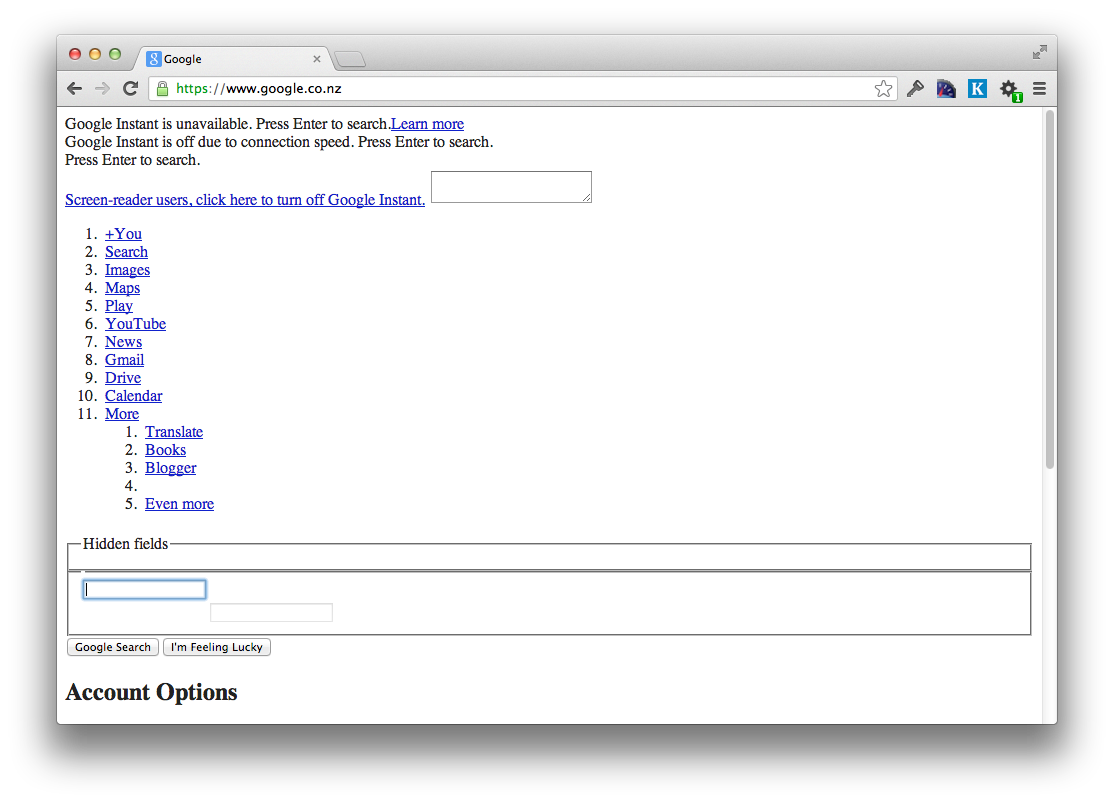
This is a picture of what Google looks like when you see only the HTML - no CSS or Javascript.
CSS is the style sheet language
CSS is used to define the appearance of a web page: the colours, the sizes, the layout.
It can be thought of as the _design language_.
It tells our web browser how to display the HTML.
CSS stands for _Cascading Style Sheets_.
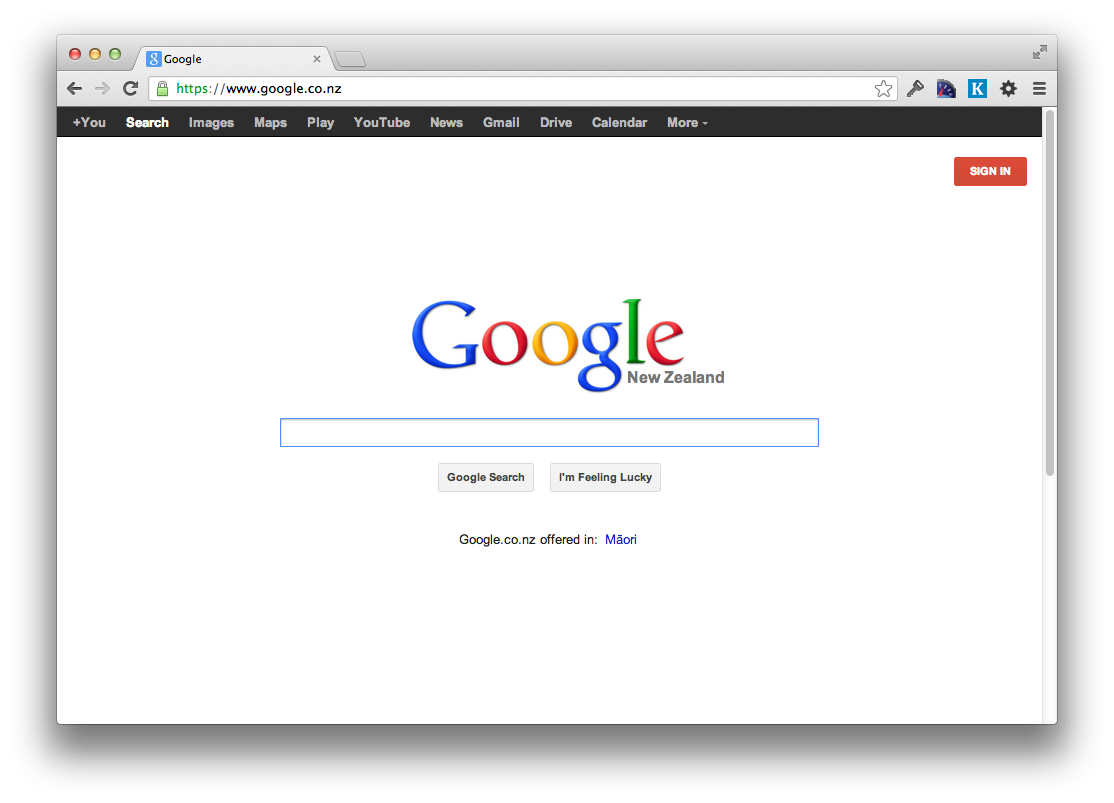
This is a picture of what Google looks like when you combine the HTML and CSS.
JavaScript is the programming language
JavaScript is used to define any interactivity on a web page: dropdowns, popups, anything that changes after the page is first loaded.
It can be thought of as the _interaction language_.
JavaScript is often known as JS for short, and is actually quite different from Java, which is another programming laguage with a similar name. Tricky!
This is a picture of what Google looks like when you see all the HTML, CSS and JS working together.
HTML + CSS + JS = Website!
Every web site that we visit is made up of all these files.
There are HTML files, CSS files, JavaScript files and also files in lots of other languages.
Other programming languages are used for making more complex websites, with user accounts you can log in to, or shopping sites where you can buy things.
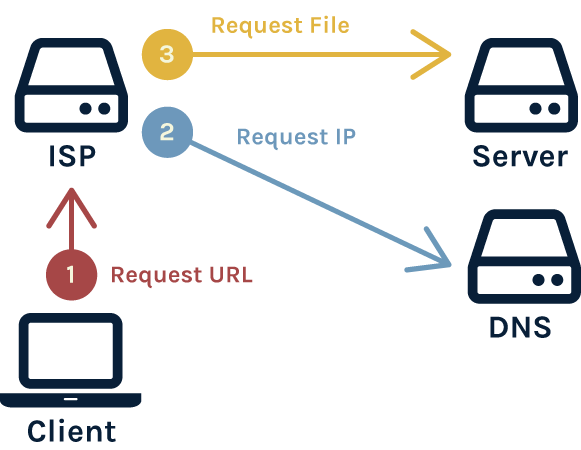
Loading a Webpage
So how does our computer load a web page over the Internet?
First of all the client, your computer, sends a URL request like "youtube.com" to your ISP (eg. Orcon, Spark or Vodafone).
Your ISP sends a request to the Domain Name Server, which turns the URL into an IP Address.
Using the IP Address, your ISP can find the actual server where the web page files are stored, and send them back to your computer.
All these separate parts are owned by different people.
Kinda like telephones!
The Internet can be compared to the telephone system:
Nobody owns the whole thing
Companies do control individual parts
Telephone numbers and IP addresses are unique
There is no central control room
Telephone numbers, IP addresses and street addresses are all unique locations across the whole planet.
If one person's telephone stops working, or one city's phone system stops working, or even a whole country, phones will continue to work.
The Internet is the same. It is _decentralised_ which means that it has no central control room and it can still function as a whole if some parts stop working.
An ISP can charge extra to allow access
to your favourite website
e.g. Facebook, YouTube, Google
What if the government or Spark decided you had to pay $10 for every YouTube video you watched?
What if you had to pay an extra $50 a month for access to Facebook?
Even though YouTube and Facebook themselves are free, it is possible for ISPs to know what data you are accessing from which websites, and charge you for that.
A government can censor access to information
e.g. North Korea and China
Internet access is illegal in North Korea. Only a very few government officials have access to the Internet through a secret connection. The rest of the citizens only have access to the country's own intranet.
This way, the government can control everything their citizens read on the Internet, and ensures that nothing is published which disagrees with the government.
China controls all search engines to ensure that the citizens can find only the information they allow them to find.
Chorus owns the Southern Cross Cable
They could slow down international requests for other ISPs
The Southern Cross Cable is our only connection to the outside world.
It carries all our phone and internet communication.
Your corner of the web
By creating your own website, you are taking ownership of a small portion of the world wide web.
It's all yours.
You can publish and share anything you like, go forth and create!
Making our own website lets us shape the internet and share information with anyone in the world.
What would you like to share? Have a think about it, because today you get to make a website about anything you like.
Cats? Rugby? Surfing? Unicorns? Movies? Yourself? Anything goes. Have a think.
Dive into HTML
Putting content on your page
Let's begin with some HTML and CSS snippets.
HTML With Alpacas
Open this link in a new tab: Alpacas Code
Keep it open! We are going to be using HTML
To learn some HTML, we're going to have some help from alpacas!
Click the orange link to open up the Alpaca starter code.
CodePen Editor
CodePen shows us our code on the left,
The grey text at the top is a comment. It is not visible in the output.
The white text is code. It is visible in the output.
Our output looks like plain black text on a white background right now. Take a look at the next slide to see what we will be creating.
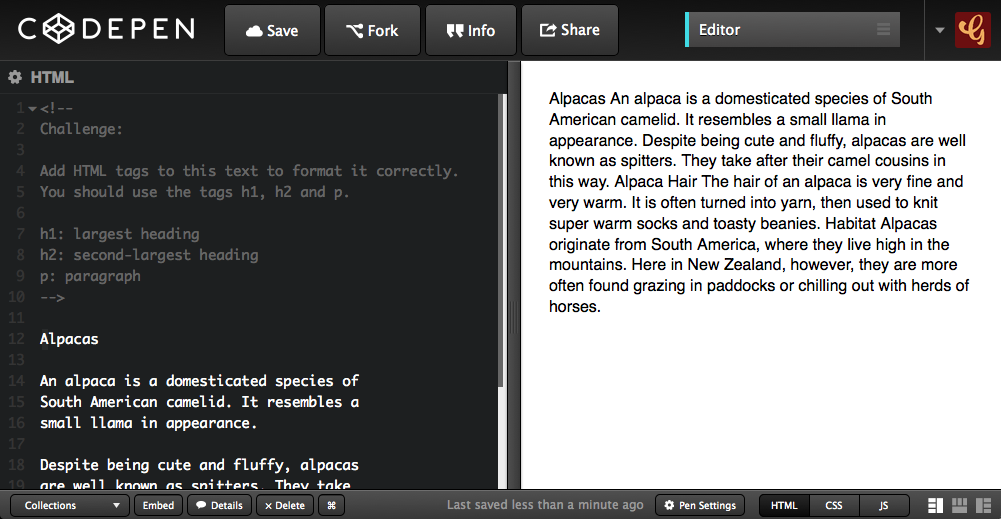
Alpaca Text Example
We will use code to make our output look like this
This is the output we will be creating.
Using HTML tags, we will convert our plain text into this nicely formatted output.
We will also add some images to our page.
Jump to the next slide to get started.
Headings
Add <h1> and </h1> tags to make the Alpacas heading big and bold.
<h1> says "start the heading here"
</h1> says "end the heading here"
Let's start with some really common HTML elements.
The first line is how we make large heading text, using the `h1` element. That's a "one" after the "h" by the way!
See how the start and end of the element are written the same, except for the extra "slash" at the end? That's a really common format in HTML.
Subheadings
Now use <h2> tags to make Alpaca Hair and Habitat big.
h1 is the biggest headingh2 is the second biggest headingh3 is the third biggest heading
h6 is the smallest heading
Just like we used `h1` for the most important title on the page, we can use `h2` for headings which are second most important.
The start and end of the element are still written the same, with the extra "slash" in the closing tag.
Paragraphs
Now use <p> tags to split up your paragraphs.
<p>
An alpaca is a domesticated species of
South American camelid. It resembles a
small llama in appearance.
</p>
Put a <p> before each paragraph,</p> after each paragraph.
Paragraphs of text use the `p` element.
A paragraph of text will automatically have some space before and after it.
Links
Find the word Wikipedia in your code.
Turn it into a link using a tags, like this:
Then add the href attribute to the opening tag.
<a href="#">Wikipedia</a>
This turns the link blue, but we need another step to make it clickable.
Links help us connect our website to the rest of the World Wide Web.
The `a` element stands for "anchor" but you can think of it as meaning "action" if that's easier to remember. Clicking a link takes you to another web page.
Link Attribute
We tell the link where to go when it's clicked using href.
Find your opening <a> tag. Add in the href and link.
<a href="http://en.wikipedia.org/wiki/Alpaca">Wikipedia</a>
The only part we added was:
href="http://en.wikipedia.org/wiki/Alpaca"
The attribute `href` stands for "hyperlink reference" which is just a fancy way of saying "website address".
The `href` attribute is what we use to tell a link where it should link to.
Image Source
Find an image online, and copy the link to it.
Replace the # as the src value, using paste:
<img src="http://place.com/photo.jpg" height="100">
Find and add at least 2 more images.
To get your image working, you will need to replace the hashtag `#` with an image URL.
Find an image you want to use online. Right click it, and choose "Copy image URL". You can then paste the URL into your code.
If your image doesn't work, try another. Linking to some images is blocked by the sites who own them.
Final Result
Your own output window should now look like this:
If your own page doesn't look like the example, check that all your tags are correct!
Remember most tags come in pairs, but images only need one tag.
Designing with CSS
Styling your page content
Let's begin with some HTML and CSS snippets.
CSS With Grumpy Cat
Open this link in a new tab: Grumpy Cat Code
Keep it open! We are going to be using CSS
Now that we've covered the basics of HTML, let's use Grumpy Cat to take a look at some CSS.
Open the starter code and follow the steps as we did with the Alpacas.
CodePen Editor
CodePen can show us both our HTML and our CSS:
The grey text at the top is a comment. It is not visible in the output.
The white text is code. It is visible in the output.
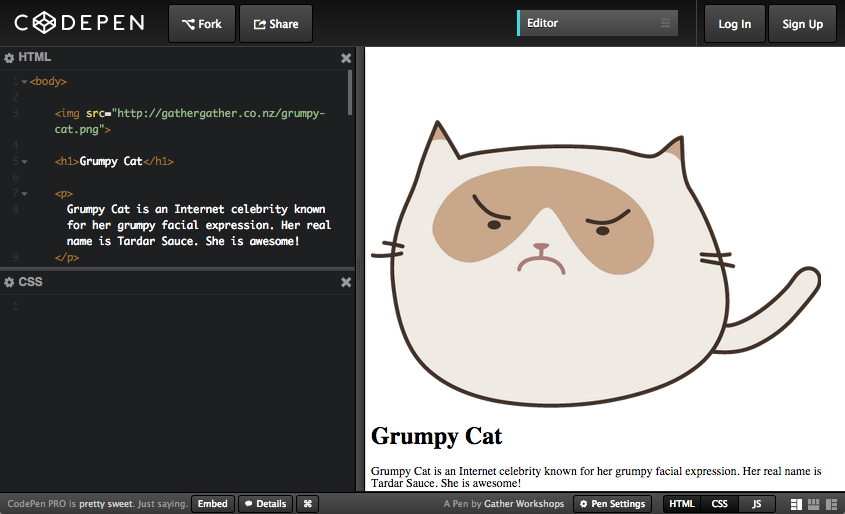
Grumpy Cat Example
Next we will use code to make our output look something like this:
Grumpy Cat Example
Classes
To make our page look pretty, first we create a CSS class with a unique name.
In your CSS panel:
.profile-pic {
  width: 200px;
}
We just created a class called profile-pic.
This class can change the width of something on our page to be 200px.
We use CSS to write code about how objects on our page should look.
This code says that any HTML element with the class `profile-pic` should be displayed as 200 pixels wide.
One little trick - don't forget the dot in front of the class name in CSS!
Applying Classes
Find the first image tag in the HTML panel,
Find this line your HTML panel:
<img src="http://gathergather.co.nz/grumpy-cat.png">
And change it to:
<img class="profile-pic" src="http://gathergather.co.nz/grumpy-cat.png">
Cartoon Grumpy Cat should now be much smaller.
We can apply a CSS class to any HTML element. We can also apply the *same* class to *many* different elements on the page.
The class name you gave your element in the HTML and the class name you use in your CSS need to match exactly.
There is no dot before the class name in our HTML but we _do_ need that dot in our CSS code.
Font Styles
There are many font options in CSS. We can create another class to try them out.
In your CSS panel, on a new line:
.page-title {
  font-family: "Comic Sans MS";
  font-size: 50px;
  text-align: center;
  text-shadow: 5px 5px 5px rgba(0,0,0,0.5);
}
In your HTML, find the h1 and apply the class:
<h1 class="page-title">Grumpy Cat</h1>
Block Elements
Block elements are the "building blocks" of our website.
Block elements are used for layout, and can contain other elements.
`header` might contain our h1 and menu bar
Info Section HTML
This content block is a section not a header, so we use the section tag.
In your HTML, before the second paragraph:
<section class="info-section">
And after the third paragraph:
There should now be a yellow block around two paragraphs.
Info Section Styles
Now we want a box around the other two paragraphs.
In your CSS, on a new line:
.info-section {
  background-color: yellow;
  padding: 20px;
  margin-top: 30px;
  margin-bottom: 30px;
}
Gallery Section HTML
Now create the section block around your gallery images.
In your HTML, before the first gallery image:
<section class="gallery-section">
And after the last gallery image:
You should now have a dark green section around your gallery images.
Gallery Section Styles
We can style our gallery section the same way.
In your CSS:
.gallery-section {
  background-color: darkgreen;
  text-align: center;
}
Then in your HTML code, add section tags around your gallery images. Remember to add the class!
If you can't remember how, there is code on the next page...
Gallery Image Styles
We can also use a trick to style the images inside the gallery section, without adding a class to every single one.
In your CSS, on a new line:
.gallery-section img {
  border: 5px solid white;
  height: 150px;
}
Your gallery images should now have white borders and all be the same height.
This style says "find a block with the class `gallery`, then find every `img` element inside it and apply these styles"
Element Selectors
Rather than always using classes, we can also choose to style all HTML elements of the same type.
At the top of your CSS, on a new line:
header,
section {
  width: 700px;
  margin-left: auto;
  margin-right: auto;
  line-height: 130%;
}
All your sections (and your header) should now be centered on the page.
Whole Page Styles
When we have styles we want to apply to the whole page, we can target the body, because all other tags are between the body tags.
At the top of your CSS, on a new line:
body {
  background-color: gold;
  background-image: url(http://subtlepatterns.com/patterns/food.png);
  font-family: sans-serif;
}
Your background should now be yellow with a pattern.
Element Selectors
Now all that we have to do is tidy up our colours. We need to remove the backgrounds we used for planning our layout.
In your CSS:
Find .page-header and remove the background
Find .info-section and change background to white
Find .gallery-section and remove the background
Grumpy Cat Output
Your own output window should now look like this:
If it doesn't, check that all your styles are correct!
Challenge
Design your own "Breaking News" item:
Go to nzherald.co.nz
Right click on the main story heading and 'Inspect Element'
Edit the headline to make your own news!
Try these too:
Modify the paragraph text to match your headline
Change the image source to link to a different image
Take a screenshot!
Now that you've learned a bit about how HTML is structured, let's try playing with some HTML on real websites.
Go to NZHerald, right click a heading, a paragraph, or an image and change the values to make some breaking news of your own.
HTML vs CSS
What are the differences?
Layout Builder
Design a theme for your site
Let's get started building our own site.
Page Layout Design
This is what our page layout will look like
We will be designing a very simple page layout.
At the top of our layout will be a header. This will contain our site heading and menu bar.
Below the header will be a content section. This will contain all of our content for each page.
Using a Layout
We can copy our layout to make more pages
Once we have our page layout set up, we will be able to use it to make more pages.
We will design what our site should look like using our `index.html`, then copy it for each additional page in our website.
Cloud Cannon lets us edit our code and preview our site
Cloud Cannon is an online website editor. We will use it to edit our code and also see a live preview of what it looks like.
It's a free service and you can even log in from home.
Create a New Project
In CloudCannon, click "Create Site" and make a project
You should already have a CloudCannon account set up. If not, create one now.
Log in to CloudCannon and create a new project.
Name your project whatever you like, for example "My Website".
Site Template
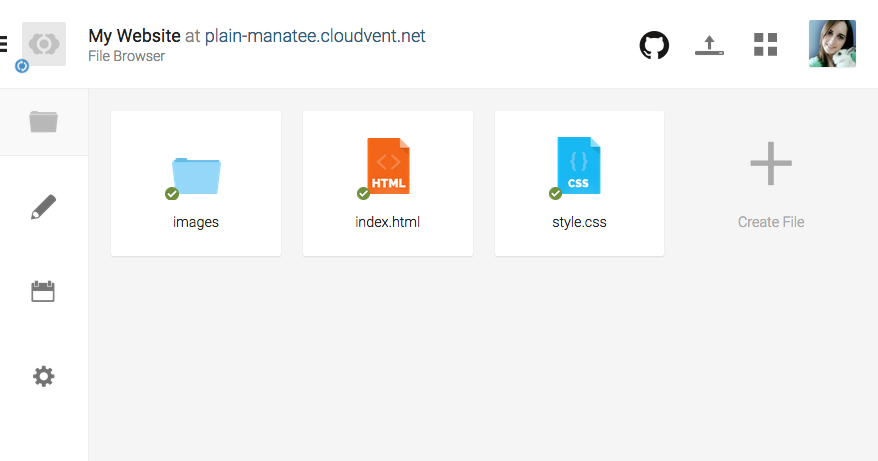
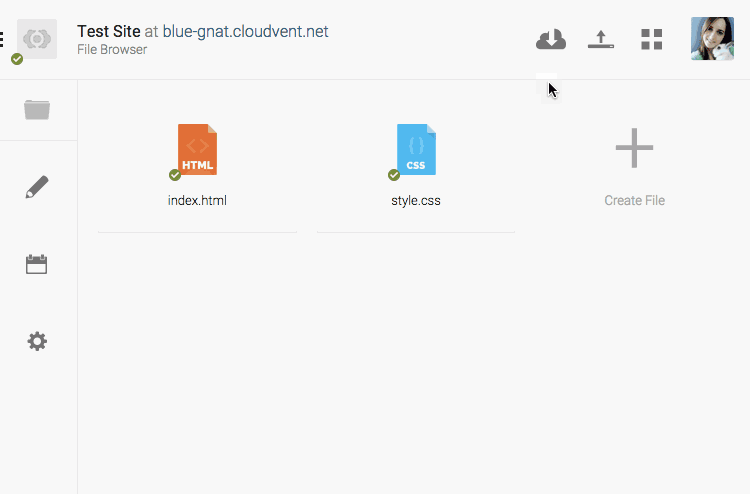
We will create images, index and style in our project folder
Congratulations, you now have a brand new empty website!
We need to add two files and one folder to our Cloud Cannon dashboard.
Once we are done, we will have `index.html`, `style.css` and an `images` folder.
Template Files
images
All your images go in this folder.
index.html
HTML code for your home page.
style.css
CSS code for your whole website.
The `images` folder is where you should upload any images you want to use in your website.
The `index.html` contains all the HTML code for your home page. If you want to add content to your home page, you would edit this file.
The `style.css` contains all the CSS code for your whole website. If you want to change how anything looks on any page, you would edit this file.
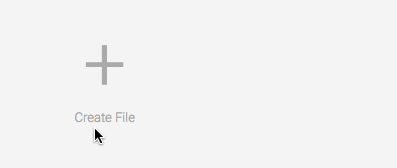
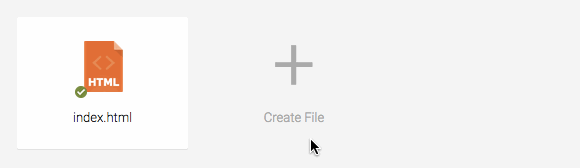
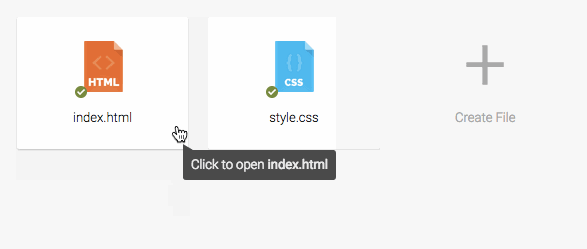
Create Index Page
Create index.html in your dashboard
In your dashboard, click "Create File" and call it `index.html`.
The `index` page is where you put all of the HTML code for your website's home page.
Your home page needs to be called `index.html` so that your web browser can load it automatically.
When you add more pages, you can call the extra ones whatever you like, but your home page should always be called `index.html`!
Index Page Starter Code
<!DOCTYPE html>
<html>

    <!-- head only used by the browser -->
    <head>
        <title>My Page Title</title>
        <link rel="stylesheet" href="style.css">
    </head>

    <!-- body contains the visible page content -->
    <body>
        <!-- My HTML Code Goes Here-->
    </body>

</html>
Copy this HTML code into your index.html
Click on your `index.html` to open it up.
Click on the "Code Editor" button at the top right of CloudCannon. This opens the code editor screen for your page.
Copy the code from this slide into your code editor and save.
The first line contains the `doctype` - this tells your web browser that the file is an web page using the latest version of HTML.
The opening and closing `html` tags wrap around all of the html code in the page.
HTML Head
<head>
    <title>My Page Title</title>
    <link rel="stylesheet" href="style.css">
</head>
The head contains a browser tab title and a CSS file link
The `head` section of a web page contains information about your page. It _doesn't_ contain anything which is actually visible on the page.
Be careful, `head` and `header` are two very different tags!
The `title` is what shows up in your browser tab.
The `link` is to the stylesheet which will contain our CSS code.
You won't be able to see your title in CloudCannon.
HTML Body
<body>
    <!-- My HTML Code Goes Here-->
</body>
All of our page content HTML goes between the body tags
Further down your `index.html` you will find the body tags.
Everything we want to be visible on our page will go between these two tags.
All HTML code you add to your page should go _after_ the opening body tag and _before_ the closing body tag.
There are some special cases, but if they come up the instructions will make it very clear.
Create Stylesheet
Create style.css in your dashboard
In your dashboard, click "Create File" and call it `style.css`.
The `style.css` file is where you put all of the CSS code for your whole website. All of your website's pages share a single CSS file.
When you add more pages you don't need to add any more CSS files. The same design rules should apply to all pages in your website, so they can be shared.
Choose a Background Type
Tiled
A smaller image which repeats
Full-Screen
A large image which stretches
Right-click an image and "Save Image As..."
A page background can really set the tone of a website, so let's start with that.
You can choose between a tiled or a full-screen background for your website.
Download one of the same images from the slide to get started. You can replace it with your own image once you've got it working.
The next slide has example code for tiled backgrounds, and the slide after it has example code for a full-screen background.
Choose one or the other for your site.
Upload Background Image
Upload the background image to CloudCannon
Upload your background image to Cloud Cannon.
To use an image in our website, it's best if we upload as part of the project.
If we just link to the image somewhere else on the Internet, there is no guarantee that the owner of the image won't delete it, move it or rename it, which would stop it from showing up on our own website.
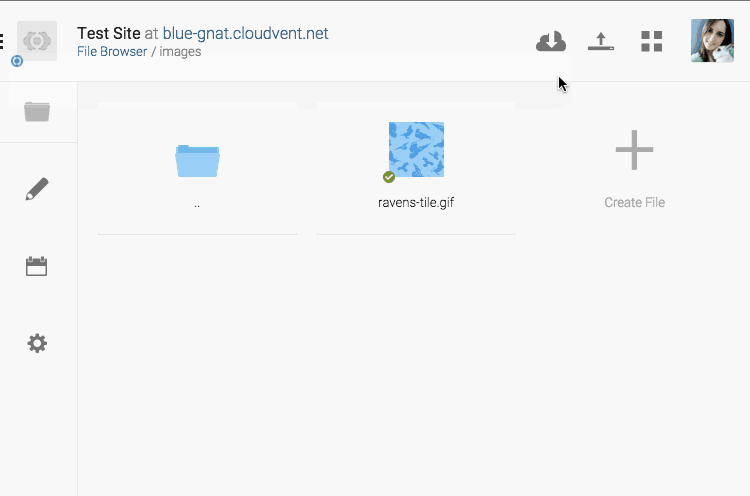
Move Background to Images Folder
Use the image options to "Move to new folder"
All images in our website should be stored in an `images` folder.
CloudCannon has a design flaw where you can't create an empty folder.
To get around this, click on your background image's options and choose "Move to new folder".
Call the new folder "images" - CloudCannon will create the folder and move your background image inside it.
Tiled Background
If you want a repeating background, use this code.
Add to your style.css:
html {
    background-image: url('images/ravens-tile.gif');
}
Make sure to choose an image which tiles nicely!
To make a tiled background, we need some very basic CSS.
Put the CSS code for the tiled background into your `style.css` file.
We are adding the background to our `html` element, because that element contains everything else on the page. Adding a background to it will make the background fill up all the space behind everything else on the page.
Full-Screen Background
If you'd like a full-screen background, use this code.
Add to your style.css:
html {
    background-image: url('images/tree-cover.jpg');
    background-size: cover;
    background-attachment: fixed;
}
Make sure to choose a nice large image!
To make a full screen background, we need to add two extra lines.
We still use `background-image` in the same way, but we also add `background-size` and `background-attachment`.
`background-size: cover;` tells the CSS to `cover` the whole html elements with the picture. It stretches the image to fit.
`background-attachment: fixed;` tells the CSS to make page content move over top of the background, and keep the background `fixed` in one place.
Background Ideas
Take a few minutes to make your background look how you want it.
There are many ways to use a background to enhance your site.
You might choose to use a design which is plain or busy, dull or colourful, animated or static.
Have a think about the theme of your site and what sort of background would suit best.
The links on this slide have a variety of different image styles you could use.
Page Content Area
Adding the main content to your page
Our second layout element will be a content section.
You'll notice that we skipped the menu bar - don't worry! We'll come back to that in the next chapter.
Our content section will go below the header, and it will contain all the text and images we want on the page.
The content section element will be a plain box. We will also add in some simple paragraphs and images to test that it looks good with content in it.
Content Section
Add to your index.html, on a new line after your closing </header> tag:
<section class="page-content">

    <h2>Hello there, amazing person!</h2>

    <p>
    This is a site all about my favourite stuff,
    thanks so much for visiting.
    </p>

</section>
We will use this page-content section on every page,
A section is just another layout rectangle, like header.
It has no design by itself, it's just an invisible box to hold content.
First we will put in some content, then we will design the section.
Notice that we have given this section a name, or "class".
Content Section Design
Add to your style.css:
.page-content {
    background-color: #222222;
    padding: 30px;
    width: 700px;
    margin: 0 auto;
    margin-top: 30px;

    color: #FFFFFF;
    font-size: 14px;
    line-height: 130%;
}
This code will give you a starting point to begin
Our content is on the page, but it is just kind of... floating.
By adding some CSS, we can make our content section visible and start working on how we'd like it to look.
In our HTML, we gave our section the class `page-content`, so we can use that name to apply styling from our CSS code.
The blank line is just to split up the layout stuff from the text design stuff, it doesn't affect the code.
Summary
Using HTML and CSS, you've now made
Next we will add some more pages to our site.
Great! Now you've got a basic page layout sorted.
Our next step is to design a menu bar so we can have more than one page in our website.
Image Gallery
Adding a set of images to your page
Now that we've got a `pictures.html` page, we can start filling it up with images.
Download Photos
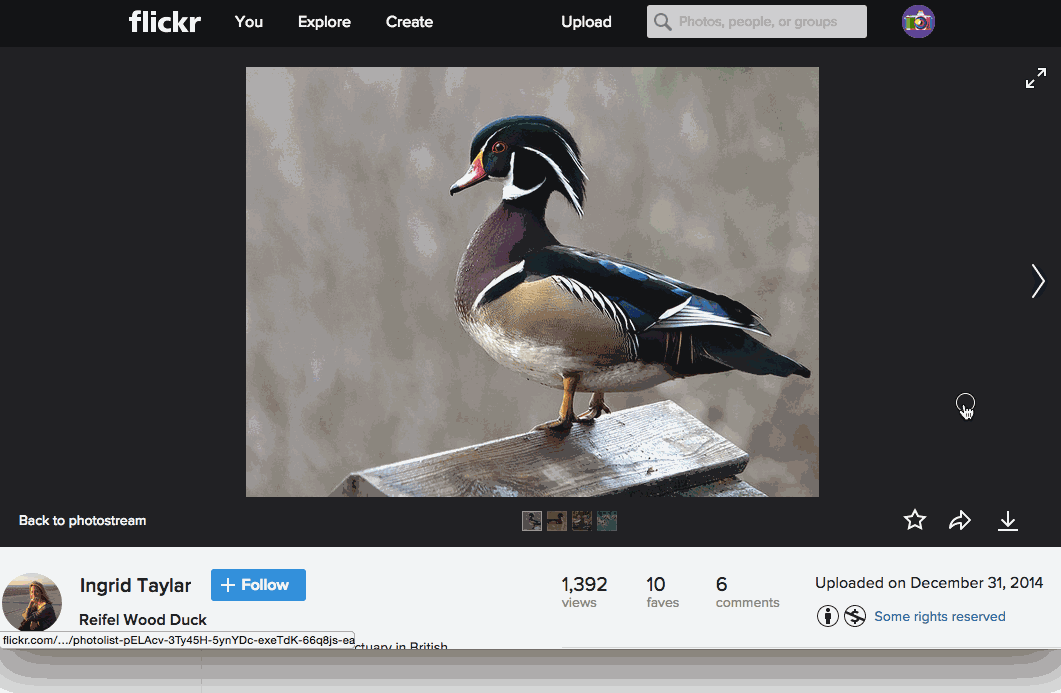
Download some Creative Commons images from Flickr
Find and download some images to use in your gallery.
It is important to use images which are shared under a Creative Commons licence, which means that the owner of the image has given permission for it to be used by other people for free.
You can use Flickr to search for Creative Commons images.
Right click an image and choose "Save Image As..." to download it.
Upload Gallery Images
Upload the images to your images folder
Upload the photos to your Cloud Cannon project.
The photos should all be uploaded to your `images` folder.
Rename Image Files
Change your image names to simple ones
Rename each of your photos to have simple names. This will make it easier to type the file names into your code.
Remember that file names for websites should be all lowercase letters (no capitals!) and should have no spaces.
Instead of a space, you can use underscore `_` or dash `-`.
Adding Images
In your page-content section, add the images:
<img src="images/first-pic.jpg">
<img src="images/another-pic.jpg">
<img src="images/cool-photo.jpg">
<img src="images/cute-bunny.jpg">
Add the images to your HTML
Add at least three images to your pictures page.
Don't worry about the sizes for now, we will fix that next.
Gallery Styles
.gallery {
    background-color: #222222;
    padding: 30px;
    width: 700px;
    margin: 0 auto;
    margin-top: 30px;
    text-align:center;
}
Gallery Image CSS
.gallery img {
    height: 100px;
    border-width: 5px;
    border-color: #FFFFFF;
    border-style: solid;
    box-shadow: 3px 3px 5px 6px #000000;
    margin: 5px;
}
Embedding YouTube Videos
Video chaos!
Embedding YouTube videos is super easy and can give your website a bit of excitement.
Videos
Find a YouTube video you like
Click "Share", then click "Embed"
Copy the code, and use it in your site!
Choose a YouTube video of your own and embed it in your page.
Bonus Challenge: See if you can center it on the page!